Hi Everyone!  Does anyone get as excited as I do around this time of year.  I love Halloween.  I love horror movies, I love haunted houses, I love seeing the cute little trick or treaters.  Everything.     

  But unfortunately, Coronavirus is kinda ruining that for us.  So decided for this week, in spirit of halloween that I would make homemade Reese’s peanut butter cups.  Everyone’s favorite halloween candy 

  But before we can make these homemade Reese’s peanut butter cups, we first need to temper the chocolate.  There is lots of information about the science behind this process.  Why we do it and a few different methods that you can use to do this.  This is not like a math problem where there is one way to get to the right answer. There are multiple.  So let’s just dive right in.

What is Tempering? Why do you Temper Chocolate?

    Tempering chocolate is the process of heating chocolate to a certain temperature in order for it to remain in a stable state to where it will set completely when cooled back down again so that the chocolate is shiny and snaps when you break it apart.  It also will melt more smoothly in your mouth but won’t melt in your hand when you hold it.

      When chocolate is tempered, it has a crystalline structure that aligns perfectly to create the characteristics that I mentioned above.  When chocolate is melted that structure breaks down and then when it starts to cool, that structure starts to rebuild and can come together in 7 different ways.  We want to control which one it is in order to get  the one that aligns perfectly.  Sound’s confusing, huh.  Well don’t worry, there are a few pretty simple methods that we can use to do this.

Which is the right kind of chocolate to temper? Understanding which temperature to use for each chocolate.

     Chocolate has two main components:  cocoa solids and cocoa butter.  Cocoa butter is the part of the chocolate that melts when you heat it and the part that needs to have that perfect crystalline structure.  The first crucial step in this whole thing is making sure you have the right kind of chocolate.  There are two types of chocolate.  There is compound chocolate such as candy melts that have other things in it besides cocoa butter like vegetable oil.  And then there is real chocolate that contains cocoa butter.  So just check the ingredients on the chocolate that you have and if you see cocoa butter, then it’s real.  That’s what you want.

     The second thing you have to know is what type of chocolate you have. Dark,Semisweet, Milk Chocolate, or White Chocolate.  Different chocolate tempers at different temperatures.

Semi Sweet and Dark Chocolate – Melt to 115• and cool to 90-95•F

Milk Chocolate – Melt to 105• and cool to 84-86•F

White or Colored Chocolate -Melt to 105• and cool to  82-84•F

Cool all of these down to 79• so that you can work with it and to room temperature to set completely. 

Reese's peanut butter Cups

IF THE CHOCOLATE TAKES MORE THAN 5 MINUTES TO SET AT ROOM TEMPERTURE THEN YOU HAVE DONE SOMETHING WRONG

What are the methods to temper chocolate?

      There are many different methods outlined below for how to temper chocolate.  The main thing to remember is to make sure your chocolate does not go above the threshold of the temperatures listed above.  Just for clarity, I am going to be talking about all of these methods as if I was tempering milk chocolate because that is the chocolate that I am using to make the homemade Reese’s cups.

Seeding

     The first method is seeding.  This is when you put half of the quantity of the chocolate that you are using in a double boiler, and melt that down, bringing it to 105•.  Then take it off the heat and add in a handful at a time of your unmelted chocolate and stir it in until melted.  This process will cool the chocolate as well as add to the quantity that you have to work with.  The theory behind this method is that the crystalline structure in the melted chocolate is broken down and the crystalline structure In the unmelted chocolate is perfect, so adding the unmelted to the melted will strengthen the structure.  So as you add and melt that chocolate you are looking for it to reach 84• and then it is ready to go in whatever mold you want to use or be used however you would like.   In our case that’s the Reeses’s cups and we will talk about that process a little later.

Note:  It is very easy to exceed the temperature that you need to achieve temper with this method because in this method you have to use a double boiler which uses a glass or metal bowl, which tends to hold onto heat.  Because of this, it is a good idea to put the melted chocolate into a separate bowl after it comes off the double boiler.

Beta Crystals

       Beta Crystals are freeze dried cocoa butter powder so all you have to do with this is melt your chocolate, cool it to 84• and add in a couple scoops of this powder. Mix it in and that’s it. It’s ready to use. This can be found on amazon and I will link it below.

Sous Vide

      A Sous Vide is a cooking device that is used to heat a tub of water to a certain temperature and it ensures that the temperature never goes over the temperature that you set it at.  It doesn’t matter how long you leave it.  It will stay precisely at that temperature.

        To do this though you have to make sure that absolutely no water gets into your chocolate because as you may know, water and chocolate are not friends.  Just a drop of water will cause chocolate to seize and be ruined.  So you can do a few things.  You can put the chocolate in a vacuum sealed bag or you can put it in a double bagged zip locked bag that is clipped to the side of the tub of water.

       After that’s done, your first step is to set the sous vide to 105•.  Once there you are going to cool it down to 79• and then back up to 84•.  Once that is done, just take the bag out of the tub and dry it off real good. Snip the corner of the bag and you are good to go.  You can now use this as a piping bag to squirt your chocolate where ever you need it.

Microwave

         The microwave method is by far the easiest in my opinion.  First put 75% of the chocolate that you are melting in a microwave safe, plastic bowl and put it into the microwave for 30 second intervals high power, stirring in between until the chocolate is half melted and then do 15 seconds until the chocolate is completely melted.  Then with the other 25% of unmelted chocolate, you are going to add that in in small handful stirring in between until completely melted.  If the chocolate doesn’t fully melt you can pop it into the microwave for 10 seconds to warm it slightly.  We just don’t want it over that 84• zone or you temper will be ruined.

Now To Make Our Reese’s Peanut Butter Cups

      Now that all the hard stuff is over, let’s talk about the Reese’s Peanut Butter Cups.  Before any of this tempering business happens, we have to do a little prep.  We have to mix confectioners sugar, peanut butter, unsalted butter (softened) and vanilla extract (measurements listed below) together until you get a firm, sticky paste.  At this time you also want to get your muffin tin prepared by simply lining each cavity with cupcake liners.  Then just add about a spoonful of your chocolate into the bottom of each liner and tap the tin on the work surface to get the chocolate to settle in the pan.  Then add a spoonful of filling to each cavity.  Just form the filling into a disk and push it down slightly into the chocolate.  Then just top each with more remaining chocolate, tapping on the table to settle.  Add as much as you need to cover the filling.  Just be sparing until you know you have enough for each.

     I hope you all try this recipe.  That was a lot of information I threw at you and the science makes it sound intimidating and like you have to be a master chocoletier to pull it off but I promise it’s so so easy.  Check out my YouTube video linked below for more information and you can also reach out on my Facebook, instagramtwittersnapchat or Pinterest if you have any questions.  Have an amazing week, guys and I will see you next time. Bye!

Reese's peanut butter Cups

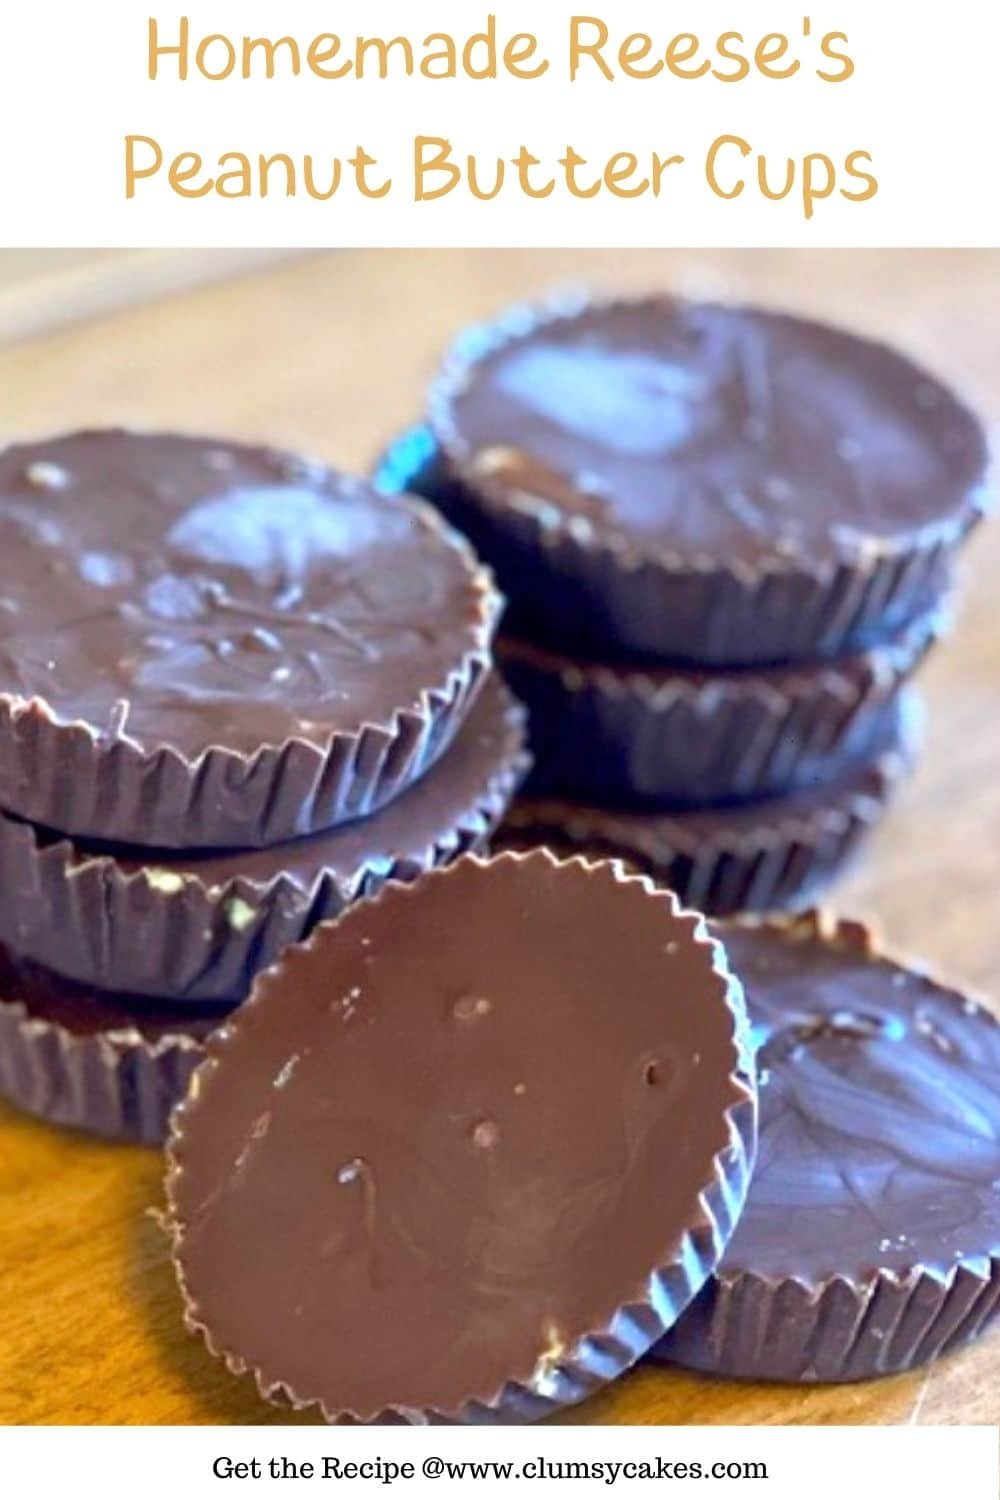
Homemade Reese's Peanut Butter Cups

Yield: 12 Cups
Prep Time: 30 minutes
Cook Time: 2 minutes
Additional Time: 5 minutes
Total Time: 37 minutes

A recreation of erveryone's favorite halloween candy, the Reese's Peanut Butter Cup. A disk or cup of silky smooth milk chocolate with rich peanut butter filling in the center.

Ingredients

  • 1/3 of a Cup Creamy Peanut Butter
  • 1/6 of a Cup of Granulated Sugar
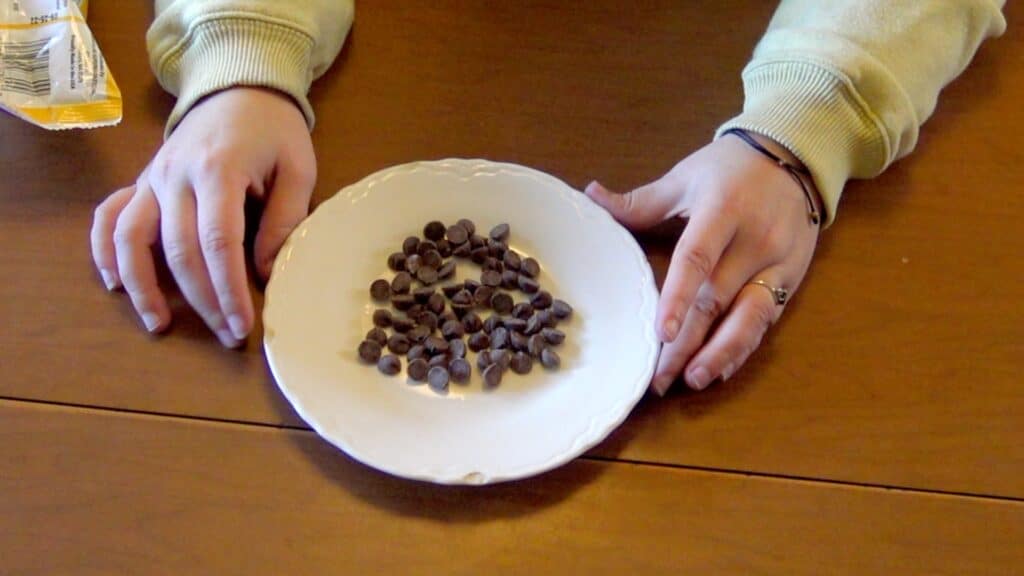
  • 12 Ounces of Milk Chocolate
  • 1/6 of a Stick (1.5 Tbsp) of Unsalted Butter
  • 1/2 of a tsp of Vanilla Extract

Instructions

Prep

  1. Prepare a cupcake tray by putting a cupcake liner into each cavity. Set aside.

Peanut Butter Filling

  1. Blend the butter,peanut butter, confectioners sugar and vanilla extract until you get a dough like mixture. Leave in the fridge to chill until the chocolate is done.

Temper the Chocolate

  1. Place half the chocolate into a plastic bowl and microwave on full power for 30 second intervals, stirring in between each interval until half way melted and then, do 15 second intervals (stirring in between until fully melted.)
  2. Now add handfuls of the remaining unmelted chocolate and stir it in melting completely before you add the next handful. Put the chocolate in the microwave in 10 second intervals until fully melted if needed. You want the chocolate to be fluid not paste. Just make sure your chocolate doesn't go over 84•.

Putting the Reese's Together

  1. Pour about a spoonful of chocolate into the bottem of each cupcake liner. Tap the cupcake tray on the table to get the chocolate level in the pan.
  2. Form about a spoonful of the peanut butter filling into a disk and place it into each liner. Pushing the disk down into the liner just a little bit.
  3. Add another spoonful of chocolate to the top of each cup. Tap the cupcake tray on the table to level out the chocolate again.
  4. Leave at room temperture to set for 5 minutes to set.

      If you have any questions or comments please don’t hesitate to leave a comment down below, message me on instagram, facebook or leave me an email. 

Leave A Comment

Your email address will not be published. Required fields are marked *

This site uses Akismet to reduce spam. Learn how your comment data is processed.