There is nothing quite like listening to Christmas music and making a gingerbread house with your family. Sure, they take a lot of patience but hey, no one is grading you on this. Just have fun with your family.
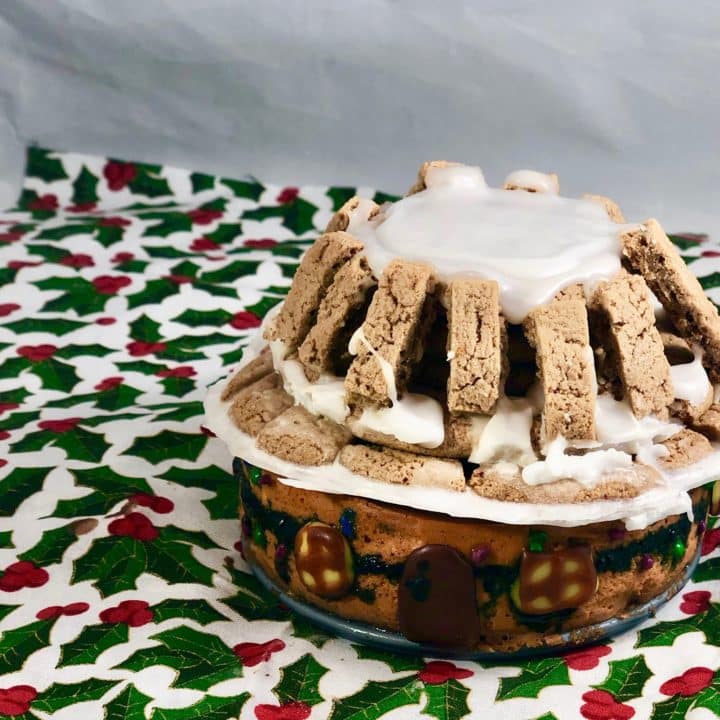
The only problem with gingerbread houses is they don’t involve cheesecake. Well, this one does. The bottom of the house is cheesecake with a gingersnap roof on top. Then it has a royal icing door, windows and decorations.
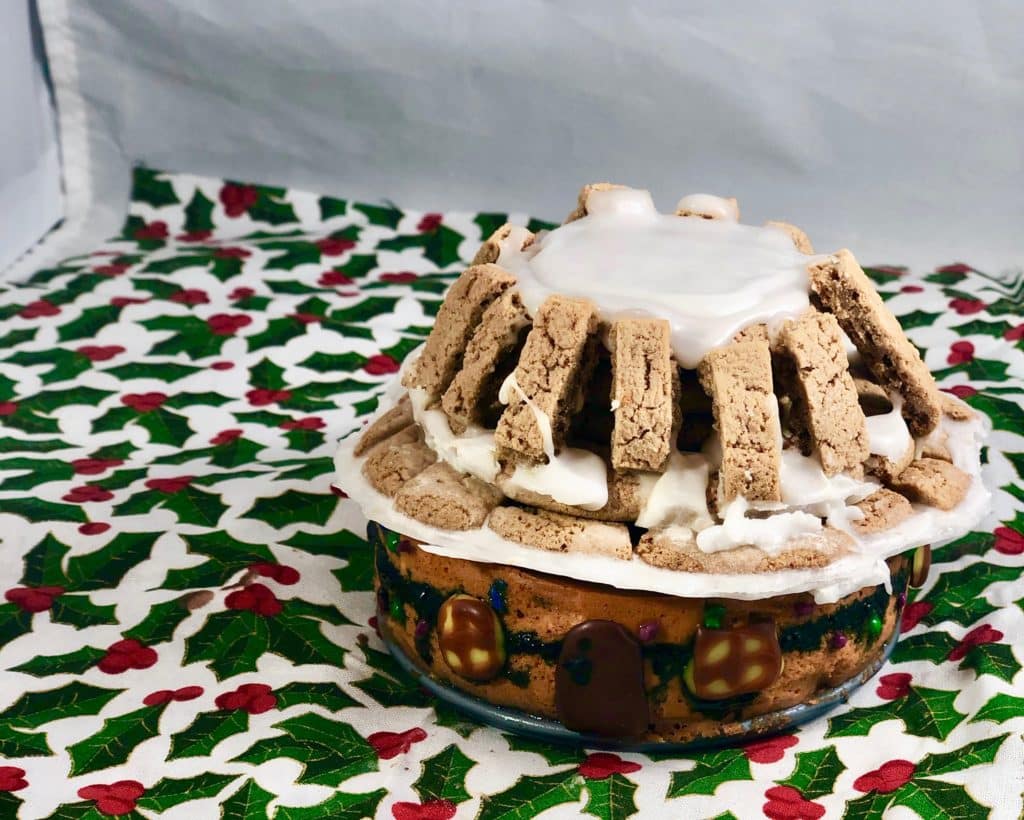
The thing that I don’t like about gingerbread houses is that it can be intimidating when you see all those beautiful and flawless gingerbread houses on instagram. You think “why bother? I can’t do that.” But the beauty of this gingerbread house is that not being perfect adds to the whimsical feel of this cake. Think of when you see a gnome cottage in a movie or story book. It’s not perfect. The windows are crooked. The decorations are kinda odd. Nothing looks flawless. So, please don’t be intimidated by this.
Construction
While this cake is in the oven, cooling and setting, you can make the decorations for this house that also need to dry for 24 hours. That includes the roof, the windows and the door.
Royal Icing
Before we can do anything we need we need to make the glue that holds this house together. Edible glue that is. Royal Icing. This can absolutely be store bought but I like to make my own. That way I can adjust the consistency to my liking.
Royal icing is super simple. All you need is confectioner sugar, also known as powdered sugar and milk. Just add the milk to the sugar until you get a slightly runny, paste-like consistency. You can always add more milk or confectioner sugar to adjust the consistency. More milk to make it looser. More confectioner sugar to make it thicker. When it’s perfect, divide it into 3 bowls. Leave one white, color one brown and one yellow. Make the white one just a tad looser so that it will ooze in all of the grooves just a little easier. You are going to be using the white frosting first, So cover the other 2 bowls with a damp paper towel so they sent dry out.
Roof
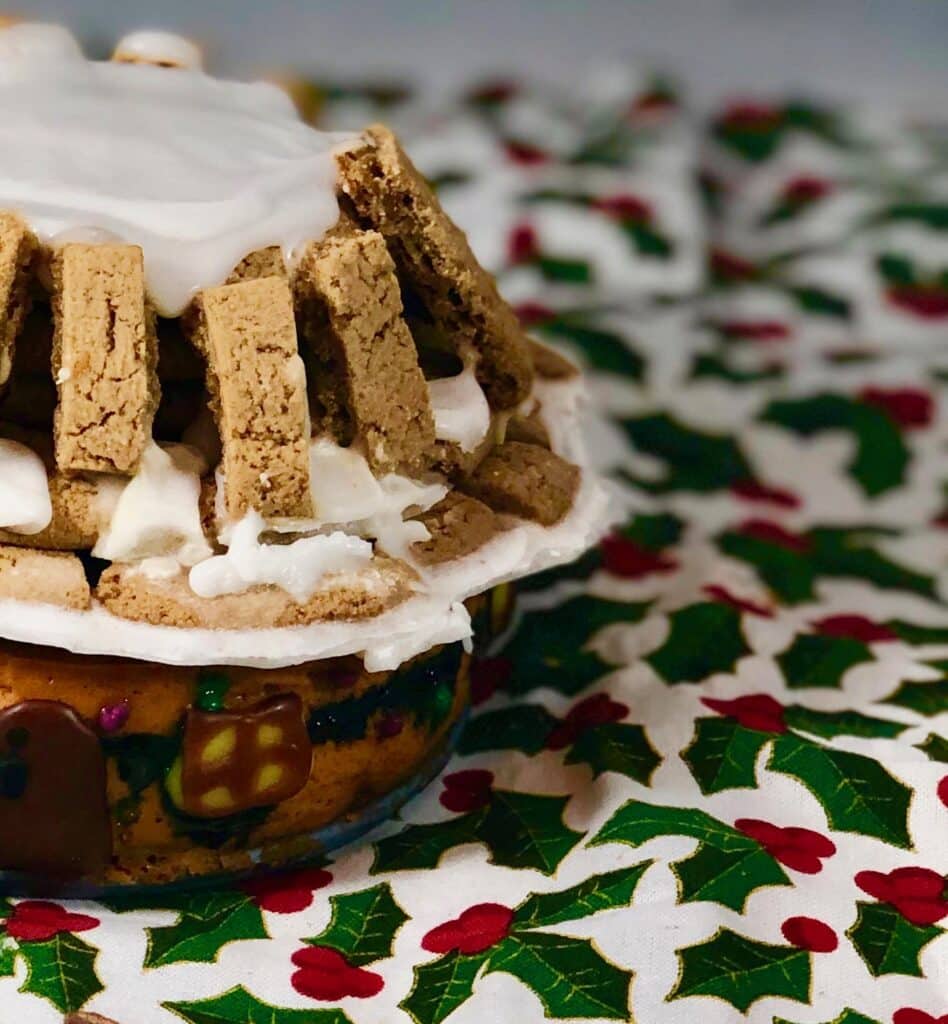
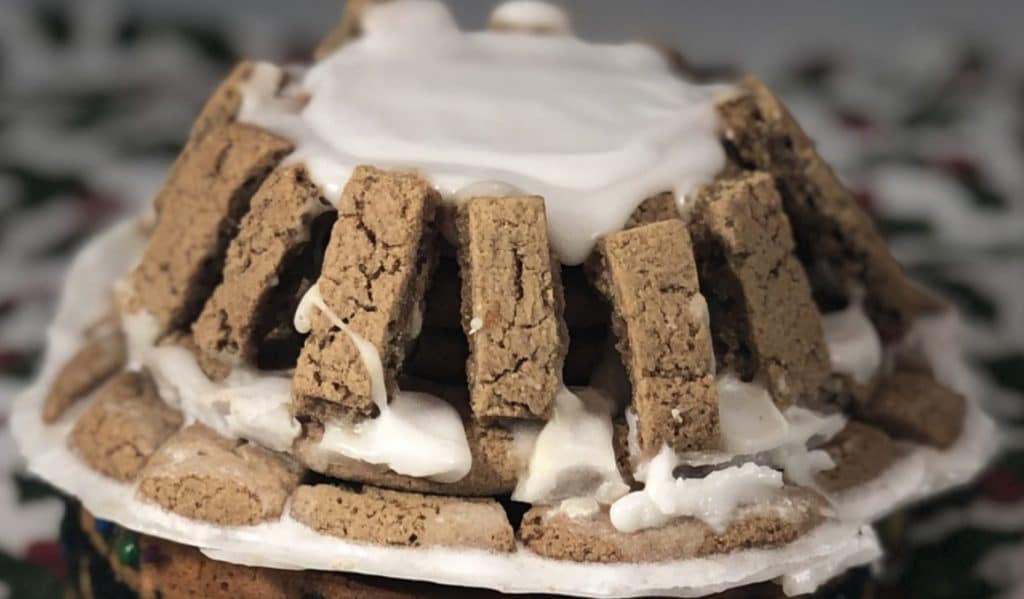
The only part of this “house” that is actually built out of cookie is the roof. So to start, we are going to make the 4 Inch base. I made some templates/diagrams for you with measurements to help you out. The 4 inch base is diagram one. Once you have that, we are going to give this roof some height by stacking 3 gingersnaps on top of that base with white frosting in between each one.
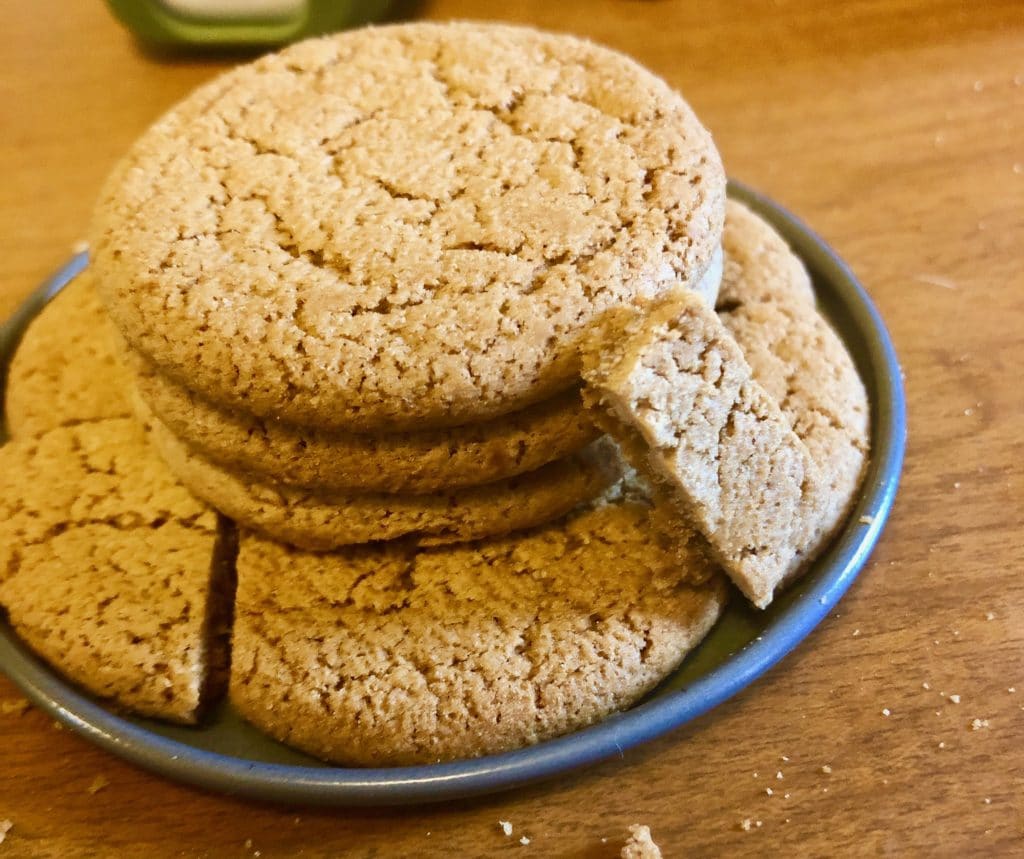
Now to make this roof look like a roof. To do that, cut 12 1 centimeter by 3 centimeter planks out of the gingersnaps (template below) and use a searated knife to cut them without them breaking. Place them so that one end is resting on the top of the roof and the other is resting on the bottom like in the picture above. Use some royal icing to secure it.
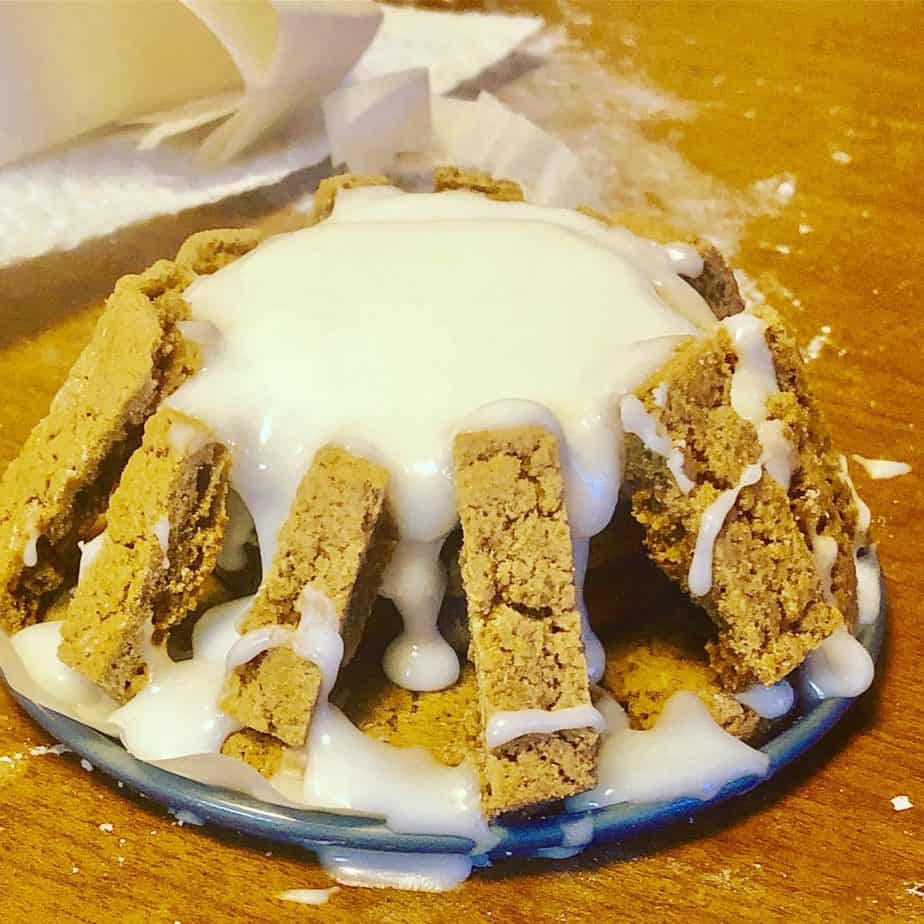
What we have right now is a fine roof by itself but it is the same width as the cake so we have to create a lip so that it extends a little farther than the cake itself. This way, it truly looks like a roof. To do this we have to create a 5 inch circle of gingersnaps. I have a template of that too down at the bottom of this post. You have to play a little bit of jigsaw puzzle to create a 5 inch circle but it doesn’t have to be perfect. The more wonky it looks the more it looks like cobble stones in my opinion. And don’t worry too much if the cookies don’t line up perfectly together. Once you put the icing on it and work it in the grooves and let it dry it’ll work out fine.
Once you have that all constructed and put together with icing just spread some more icing on top and sandwich that to the bottom of the 4 inch base. Let that dry for 24 hours. Again, if you do this the day that you make the cheesecake, when the cheesecake is done setting on day 2 the roof will be ready as well.
Windows and Door
The next step here is to make the windows and the door of this cottage. First you are going to take out a small cookie sheet. Tape down the window/door template from down below and line it with parchment paper on top of that.
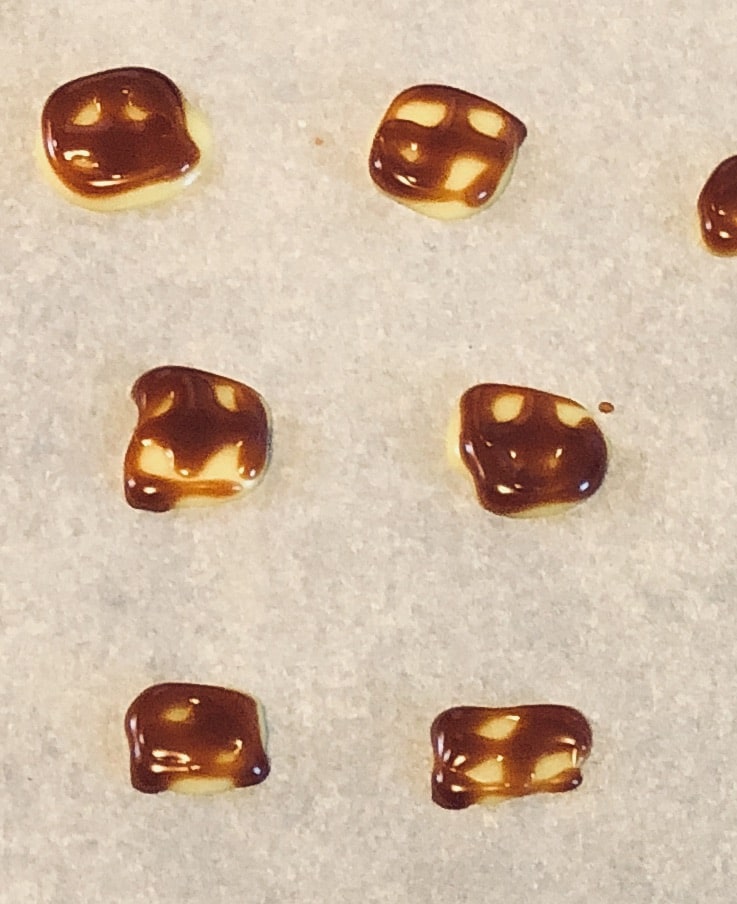
Begin by using your piping bag filled with yellow icing and pipe some small squares (template below) and fill them in. You only need 5 but I included 20 in my template which I recommend you do. The reason being that if you have many, you can pick the best ones.
Once these dry just a little, use the brown icing to outline the squares and pipe a cross on the square to resemble a window pane. Leave those to dry for 24 hours.
Next we are going to make the door. Again we only need one but I included 5 So that you can make many and chose the best one. Also the dour template that I included is just so that you get the right shape. It’s not meant to be the same color or design. But if you want to, by all means go for it. Once they dry just a little pipe a small dot towards the left side of the door to look like a door knob. Let that dry for 24 hours. You have made it passed day one. Good Job! Now you can relax and wait until tomorrow.
Putting It All Together
By this time, you should be on day 2 and all of your components should be dry and set. The hard part’s over. Now it’s time to put it all together. So it’s time to make up that second batch of royal icing, divide it 4 ways. Color them black, pink, blue, and green. Pipe a line on the un-molded cheesecake in black a little higher than middle of the cake. This is the point where you are going to pick your windows and door. Once those are picked, find what you want to be the front of the cake and place the door. Then, using the diagram to help you place the windows. Then just pipe small dots above and below the black line in the different colors to resemble Christmas lights.
Now, take any left over icing, no matter what color, spread it on and place the roof. Make sure it’s in the middle. Once you do that, you’re done.
It’s important to know that putting left overs of this cake in the fridge will make the icing kind of melt, so it won’t look right. Cheesecake can be left at room temperature safely for 1 hour before it is unsafe to eat.

Thank you so much for spending some time with me. I hope you all have an amazing Christmas and I hope you make this cake. It’ll definitely be a hit at your Christmas party. Especially if you make a whole bunch of them and make a village. That would be so cute! The possibilities with this are so endless. Use this as a guideline to make whatever you want. Creativity is always encouraged.
Christmas Gingerbread Gnome Cottage
A creamy, smooth gingerbread spiced cheesecake, decorated to look like a gingerbread house.
Ingredients
Crust
- 1/4 Cup of Gingersnaps (more for decoration)
- 2 oz of Unsalted Butter
- 1 TBSP of Granulated Sugar (Optional)
Cheesecake
- 3/4 block of Cream Cheese
- 1/4 of a Cup of Granulated Sugar
- 1/8 Cup of Greek Yogurt
- 1 Egg
- 1/2 Tsp of Gingerbread Spice
Royal Icing
- 2 Cups of Confectioners Sugar
- 2 Tbsps of Whole Milk
- Green Food Coloring Gel
- Black Food Coloring Gel
- Blue Food Coloring Gel
- Yellow Food Coloring Gel
- Pink Food Coloring Gel
- Brown Food Coloring Gel
Instructions
Crust
- Prepare a 4 inch springform pan by lining the outside bottom and sides with aluminum foil and the inside bottom with a parchment paper circle. Spray the inside with non stick spray so the parchment paper sticks to the pan. Cut a long strip of parchment paper that is as thick and wide as the sides of the pan. Use non stick spray to get the parchment paper to stick to the pan.
- Place the gingersnaps in a food processor or freezer bag. Pulse or crush with a rolling pin or meat tenderizer until you get coarse crumbs.
- Add the butter and optional sugar and pulse or crush until you get the texture of wet sand.
- Press this mixture into your prepared pan in an even layer.
- Bake for 10 minutes or until golden brown.
- Place in the freezer for 1 hour.
Cheesecake
- Place the softened cream cheese in the bowl of your standing mixer fitted with a paddle attachment or regular bowl with a hand mixer.
- On medium speed, beat the cream cheese until completely smooth. About 10 minutes. Scrape down the bottom and the sides of the bowl and beat again until smooth.
- Add in the sugar and beat until smooth and all incorporated. Scrape down the bottom and the sides of the bowl and beat once more until smooth.
- Repeat this step with the greek yogurt, gingerbread spice and the vanilla extract. Make sure the batter is completely smooth at this point before the next step.
- Add in the eggs, one at time, Beating between each addition to incorporate and scraping down the bottom and the sides of the bowl to make sure everything is incorporated fully.
- Pour the batter into the prepared pan on top of the crust.
- Bake the cheesecake in a water bath for 30 minutes or until the edges are set but the middle jiggles slightly.
- Shut off the oven, crack the oven door and leave the cheesecake in the oven for an additional hour to cool.
- Take the cheesecake out of the oven and place it covered in the fridge.
Royal Icing
- Place half of the confectioners sugar amount in a medium sized mixing bowl. Save half of the amount to make icing on day 2.
- Pour in milk a tablespoon at time until you get a thick but somewhat loose paste. You can add more milk or confectioner sugar to adjust the consistency.
- Divide the icing into 3 bowls, a third in each bowl.
- Keep one of the bowls of icing white. and the the other 2 yellow and brown.
- Place each color of icing into a piping bag, fitted with a very small tip.
The Roof, Windows and Door
- Begin by making a 4 inch circle with ginger snaps. Using white royal icing to stick the pieces together. Use a serated knife to help you cut the gingersnaps without them breaking. (see base #1 diagram)
- Stack 3 gingersnaps on the middle of that base to build up the top of the roof. Putting icing in between each to get them to stick together. It doesn't have to be perfect because it won't really be seen.
- Cut 12, 1 centimeter by 3 centimeter planks of gingersnap. Use icing to secure one end of the plank to the base and one end to the tip gingersnap.
- Create a 5 inch base, using icing to glue the pieces together (See base #2 diagram). Sandwich the rest of the roof to the 5 inch base, making sure it's lined up in the middle.
- Place more icing on the top of the roof to the cake to resemble snow. Set aside to dry.
- Take the yellow icing and pipe squares onto a cookie sheet with a piece of parchment paper on it and the template taped on the cookie sheet under the parchment paper. We will need 5 for this project but pipe a bunch so that you have some to chose from if some look better than others.
- Once that drys somewhat, take the brown icing an carefully outline the yellow squares. then put a cross on the square to resemble a window pane.
- Use the remaining brown icing to pipe door shapes. You only need one door but again pipe several so you can chose the best one. Let all of these componants dry for 24 hours.
Decoration
- Unmold the sides of the cheesecake and peel off the parchment paper on the sides.
- Place a piece of parchment paper on top of the cake, followed by a light weight cutting board. Using the bottom of the cake pan and the cuttng board, gently flip the cake over.
- Take off the cake pan bottom as well as the parchment paper circle. Replace that with your serving plate. Try to pick one with no sides so that it's easier to get at the cake to decorate.
- Prepare the black, blue,pink, and green icings and put them in piping bags with small tips.
- Using the black, pipe a line all the way around the sides of the cake in towards the middle but more towards the top.
- Find what you want to be the front of your cake and stick the door to the cake using that strip of icing to secure it.
- Place a windows. (See Diagram)
- Place pink,blue and green(or any colors you want) dots under and above the line to resemble christmas lights.
- Spread any remaining icing on the top of the cake and place the roof.
Notes
Creativity is absolutely encouraged. If you want differant decoration or differant color, please by all means, go for it.
None of this has to be perfect. It adds to the whimsical/magical feel of it if it's not in my opinion.
Click Here For The Templates and Diagram
You May Also Like
If you have any questions or comments please don’t hesitate to leave a comment down below, message me on instagram, facebook or leave me an email.
Facebook –facebook.com/Clumsy-Cakes-2058041137644585
Instagram-instagram.com/clumsy-cakes
pinterest –pinterest.com/clumsycakes
email – [email protected]
This looks like so much fun! Especially since I like both cheesecake and gingerbread (:
it was so much fun to put together
WHat a fun version and not the same old gingerbread house kits you get in the store!
And a little less construction. I know when I am making a gingerbread house, I get overwhelmed. It’s just too much.
This is such a cute gingerbread house. I love the Gnome theme, very cute and so much fun!
Thank you! It definitely had a more fairytale vibe to it so the gnome theme was perfect.
This is fun and easy to make and looks tasty too 🙂
of yea it was so much fun to put together and tasted delicious!
It looks like fun to make kids busy
absolutely and it’s a little easier than a gingerbread house. Not as much construction.
So cute! All the little details you have put into it, must have taken ages?!
a couple days. No longer that a traditional gingerbread house. Gotta allow for drying.
What a fun and whimsical cheesecake!
thank you! Yeah I got done and realized that this isn’t a normal gingerbread House. Definitely more fairy tale meets Christmas.
I love cheesecake! What a neat idea to add it into the gingerbread house.
Thank you!