Hi Everyone! Welcome back to my blog. When I first made this recipe 2 MONTHS AGO, I didn’t think it would be that big of a deal, because everything I read and watched made it not look like a big deal. Boy was I wrong. I learned so much in these 2 months and 5 attempts to get this right. If you have read my “Cake Fails” post, you know my journey and struggles with this recipe. They say that baking is a science. I never really didn’t find it to be so difficult until I met my baking nemesis, the Jiggly Cheesecake. This really is a science. I don’t mean to scare you, Or deter you from making this, I just want to prepare you. I made this post, along with the “Cake Fails” post to give you every bit of information that you need to succeed in this. If you make this recipe, I promise it is well worth it because this thing is absolutely delicious and pretty impressive.
Japanese Cotton/ Jiggly Cheesecake: Preparation
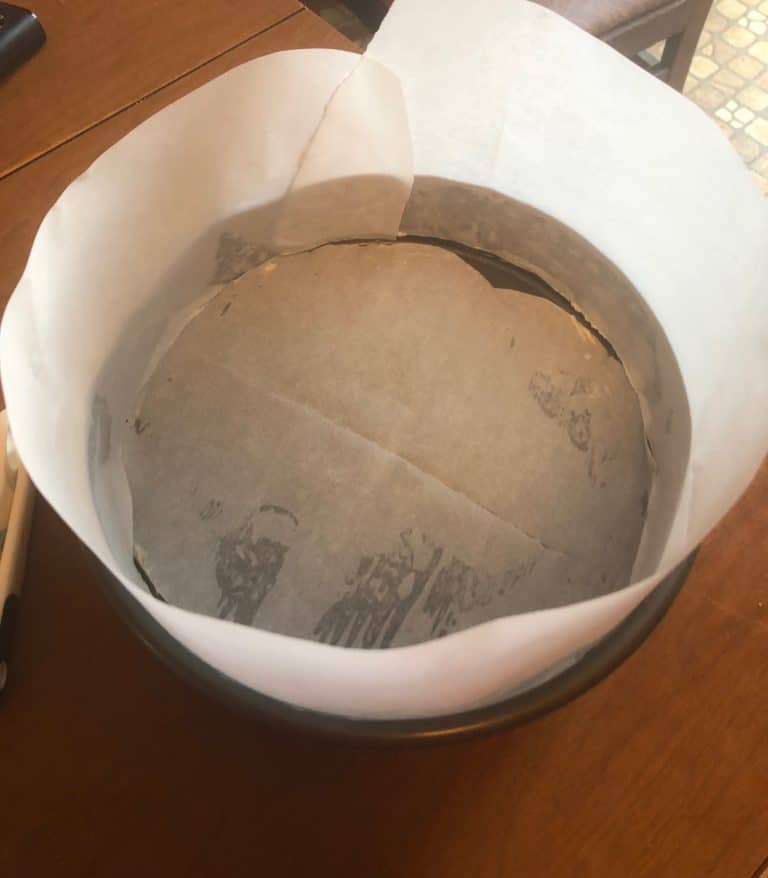
The preparation for this pan is a lot different than how I usually do it. For starters, I am not using a springform pan. I am just using a regular 9 inch cake pan. So to start cut a couple of 2 inch wide strips and lay them in a cross on the bottom and hanging up the sides of the pan. These will be our handles when we go to lift the cake out of the pan. Next, we are going to cut a 9 inch parchment paper circle for the bottom of the pan on top of the strips. Spray the pan so that the parchment paper circle and the strips stick. Lastly, just cut a strip of parchment paper to go around the sides of the pan and go a bit above the pan. Spray the sides with non stick spray so the parchment paper sticks.
Next, you are going to prep all of your ingredients. What I was doing wrong in most of my attempt was whipping my egg whites at the beginning of the recipe and letting them sit till the end. FATAL MISTAKE! Egg whites are very delicate and sugar makes them a little stronger but they come unwhipped pretty fast. So, you can’t let them sit until the end of the recipe. What was happening was I was going back to my whites at the end and there was a pool of unwhipped egg white at the bottom. So just separate your eggs, prep you lemon juice and melt your butter, milk and cream cheese together.
Japanese Cotton/ Jiggly Cheesecake : Why the Lemon?
If you look at other recipes for this cake, you’ll see that lemon is not as common. I added it in because cheesecake is just a baked custard. Custard is basically an egg mixture. Jiggly cheesecake is meant to be served hot and when a cheesecake is hot it is going to taste very eggy. When I make my normal style of cheesecake it sets in the fridge over night and when it is chilled it tames down the eggy flavor. The lemon will neutralize that eggy flavor. You won’t taste lemon, it will just make the cake not taste eggy.
Japanese Cotton/ Jiggle Cheesecake: Separating Eggs
Firstly, you have to separate eggs. If you check out my “5 best baking tips” post, you’ll see that I recommend cracking the egg into a dish, gently picking up the egg yolk with your fingers and gently tossing it back and forth between your hands to let the egg whites fall into the dish. Then put the yolk in another dish.
The reason I say this is that I see so many people trying to jiggle the egg yolk between the 2 halves of the shell. The problem with this is that the shell can be kind of sharp and jagged and the yolk is very fragile. If you aren’t extremely careful you can pierce the yolk with the egg shell, the yolk will run everywhere and you will have to start all over. There is absolutely no way to save it if this happens. If even just a small amount of egg yolk is in your whites ,they won’t whip up. And this recipe requires 13 EGG WHITES. If you are on egg 12 and break the yolk and have to start all over that is really gonna stink.
Also, you can save the extra egg yolks to use for another recipe by putting them in an air tight container and freezing them for up to a year.


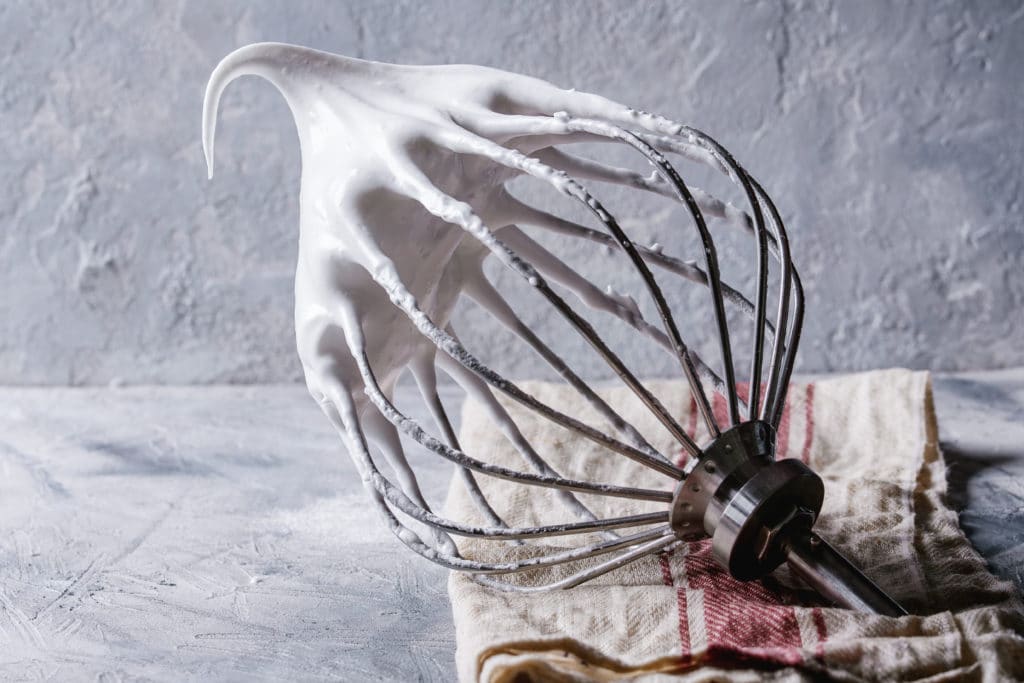
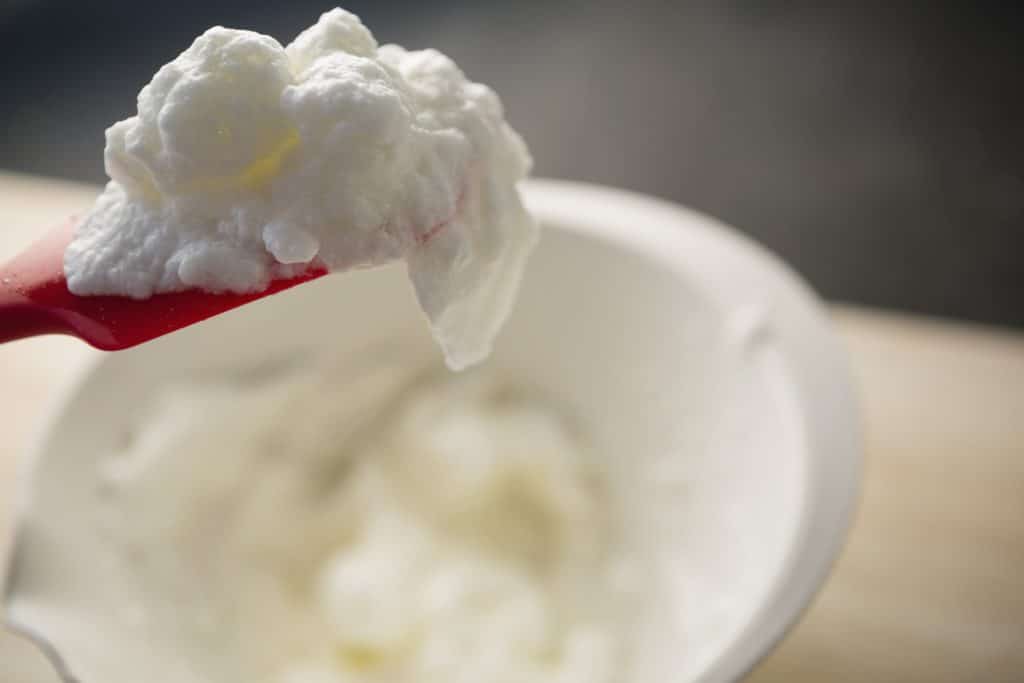
Japanese Cotton/ Jiggle Cheesecake: Stages of Egg Whipping
The success of this recipe largely depends on eggs. Mainly because there are so many eggs in the recipe but also because this cake should be tall and jiggly which happens when you have enough egg whites and they are whipped to stiff peaks. Whipping egg whites can sometimes be tricky so I want to give you a little guide as to what you are looking for.
Soft Peaks – You will reach the soft peak stage at about 5 minutes of whipping. It will be slightly off white, thick and glossy but when you take the beater out of the eggs, there will be a peak but it will fall back onto the beater like this:
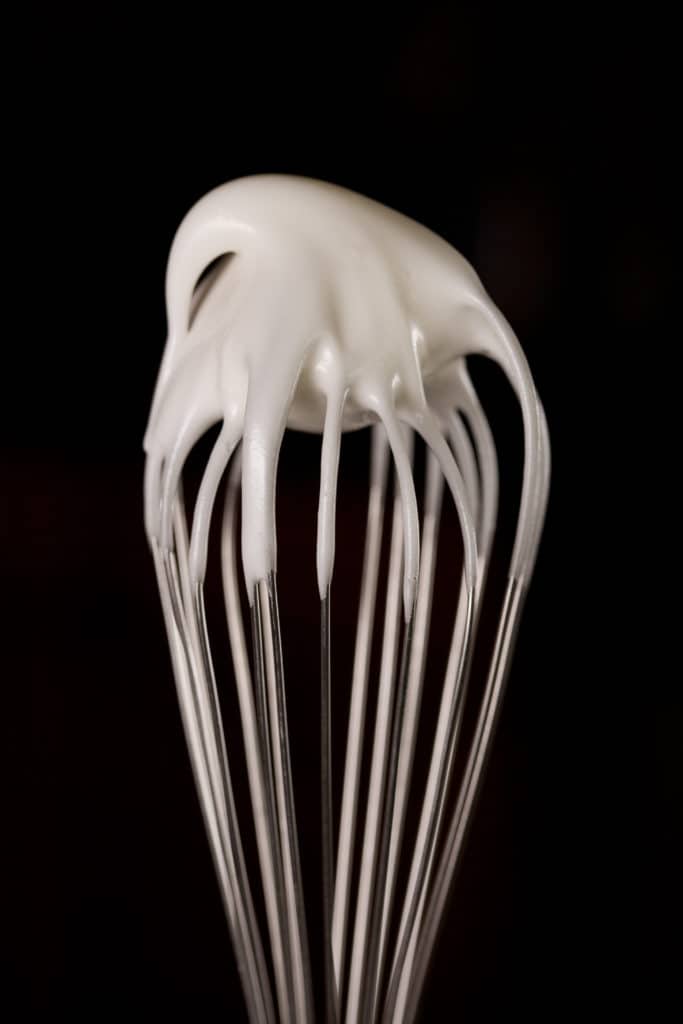
Stiff Peaks – You will get stiff peaks at around 10 minutes of whipping. They should look thick, glossy and white. The peak will stick straight up in the bowl and/or on the beater. They should look like this:
Over Whipped Egg Whites – You will notice your eggs getting over beaten when they are no longer glossy and don’t really make a peak. They will kind of resemble styrofoam like this. Cream of tarter, lemon juice or vinegar also helps to not over beat the egg whites.
Be sure to watch you eggs super close because these stages happen fast. It’s kind of like a ripening avocado. Not ready, not ready, waiting, waiting, READY, overdone.
If your egg whites are over whipped they won’t fold into the batter correctly which will make it so that your overall product will not get tall enough and you won’t get a smooth batter so the top will be lumpy.
Japanese Cotton/ Jiggly Cheesecake : Bake Time
This cake bakes low and slow. I started out baking it at 320 degrees for 25 minutes then 280 degrees for about 90 minutes. This still wasn’t working so I then did 320 for 25 minutes and then 300 for about 70 minutes and that worked better. Totally cooked through. You really want to make sure this gets golden brown on the top.
This cake was a very hard fought battle for me but it was fun to learn how to do it right. I also love sharing my failures and successes with you all so I can show you how to do it right. Like I said, this cake is absolutely delicious and well worth it. I hope you try this out for yourself. If I haven’t covered every pit fall and you need more clarification on things please visit my “cake fails” post. That takes you through my whole journey making this cake and the mistakes along the way. And please never beat yourself up if you make a mistake with this cake or any other baked good. We are all learning and part of that is making mistakes. Baking is supposed to be fun. Not a stress. You are supposed to play around with it, get a little messy and sometimes make something that’s a disaster. Life is a journey not a destination.

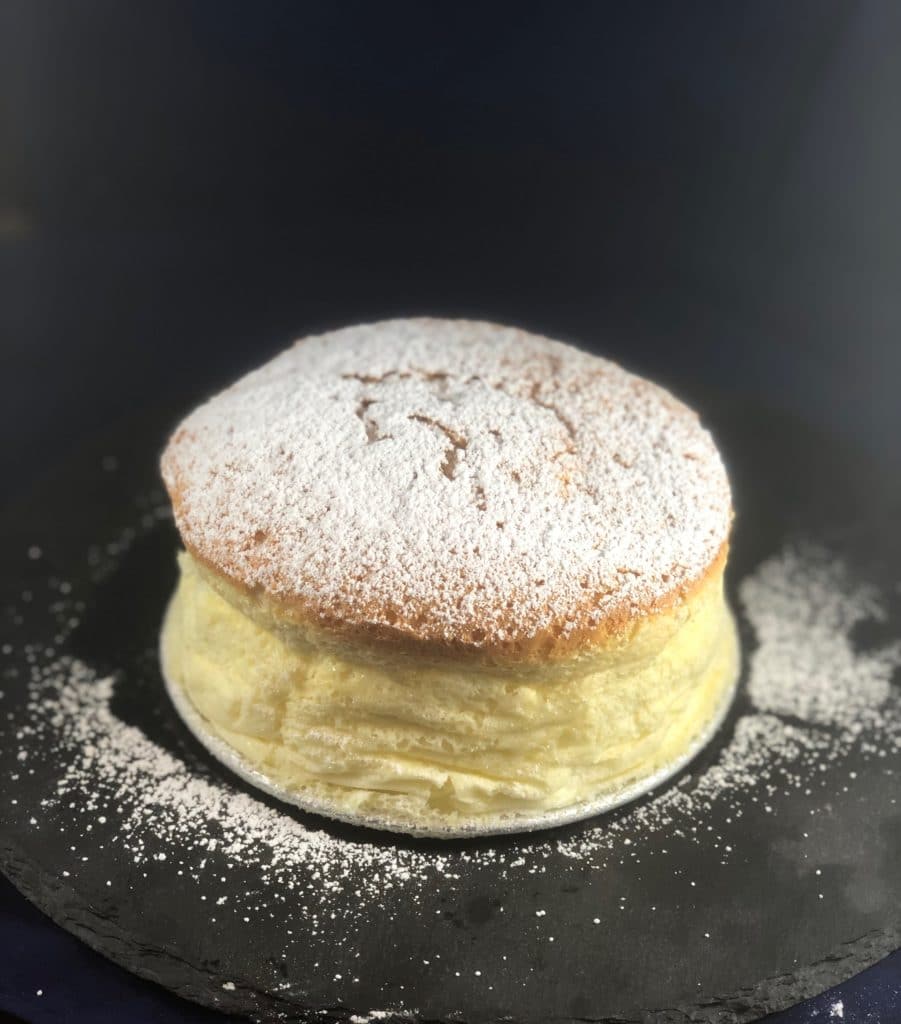
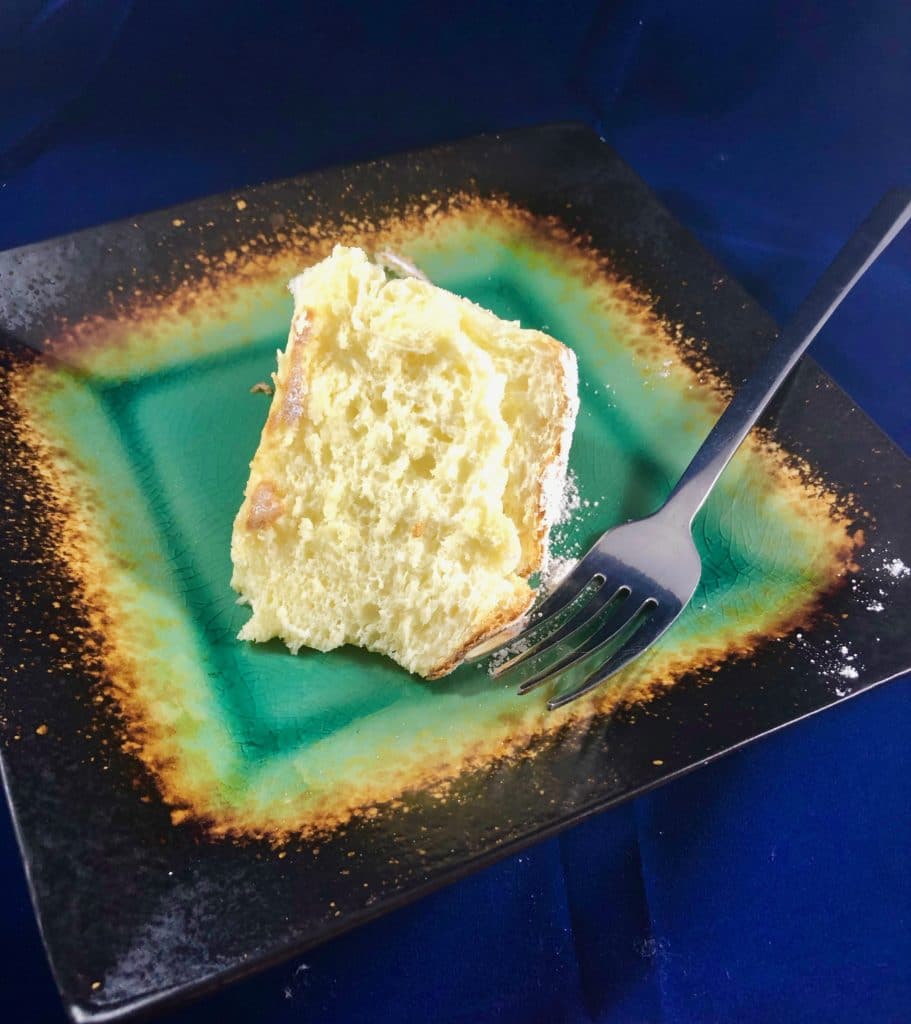
Jiggly Cheesecake
This cheesecake has such a fun texture. It's like eating clouds and jiggles like nothing you have ever seen before.
Ingredients
For Cheesecake
- 1 blocks of Cream Cheese
- 8 Tbsp of Unsalted Butter
- 3/4 Cup of Whole Milk
- 8 Egg Yolks
- 13 Egg Whites
- 1/4 Cup of Flour
- 1/4 Cup of Cornstarch
- 1 Cup of Granulated Sugar
- 1 tsp of Vanilla Extract
- 2 Tbsp of Lemon Juice
- 1.5 teaspoons of Cream of Tarter
- confectioner sugar (for decoration)
Instructions
- Preheat the oven to 320 degrees.
- Begin by placing two 2 inch strips of parchment paper in the bottem of a 9 inch cake pan in a cross configuration. Then place a circle of parchment paper in the bottem of the pan on top of that cross. Then place a strip of parchment paper along the side of the pan tall enough to extend over the top just a little bit.
- Prep ingrediants by separating your eggs into separate bowls. You can also freeze the extra egg yolks. Set that aside and sift together the flour and corn starch. Set aside. Also, prep your lemon and set that aside.
- In a medium saucepan melt the butter, milk and cream cheese until smooth and you see no lumps. Set aside.
- Place the egg yolks in the bowl of your stand mixer or regular bowl with a hand mixer.
- Whisk until pail. Add the lemon juice and vanilla extract and whisk to incorperate.
- Add the cream cheese mixture to the yolk mixture. Whisk until incorperated.
- Add in the dry ingrediants and whisk to incorporate.
- Place the egg white in the bowl of you stand mixer fitted with the whisk attachment, or regular bowl with a metal or glass bowl and a hand mixer.
- Whisk until egg whites are frothy. Add in the sugar and the cream of tarter.
- Whisk until stiff peaks form. Set aside in a seporate bowl.
- Add in a forth of the egg whites and fold them in by hand just to lighten the batter.
- Add in the rest and gently fold in 1 half at a time.
- Add the batter to the prepared pan. Shake to release any air bubbles.
- Bake in a waterbath at 320 degrees for 25 minutes. Then reduce the heat to 280 degrees for the remaining 70 minutes or until the cake has risen to about double its original hieght and is golden brown on the top. If this starts happening too quickly, just place a piece of aluminum foil loosly over the top of the cake.
- When the cake is done let it cool enough to handle and take the 2 of the handles you have created and lift the cake out of the pan and onto your serving platter. Then peel off the paper before placeing it down on your serving plate.
- Garnish with some powdered sugar on top. Enjoy!
Notes
DO NOT tap the pan on the table to get air bubbles out of the batter. Doing so may deflate the batter and it wont't rise properly.
Put the extra egg yolks from this recipe in an air tight container and freeze for up to a year.
Always use a metal or glass bowl to whip egg whites. Plastic holds in fat and which will get int your egg whites and your egg whites will not whip up well.
You May Also Like
Reese’s Peanut Butter Cup Cheesecakes
If you have any questions or comments please don’t hesitate to leave a comment down below, message me on instagram, facebook or leave me an email.
Facebook –facebook.com/Clumsy-Cakes-2058041137644585
Instagram-instagram.com/clumsy-cakes
pinterest –pinterest.com/clumsycakes
email – [email protected]